Picture this: you walk into your kitchen for a midnight snack, only to step in a mysterious puddle of water right in front of the fridge. Your heart sinks. Or maybe you’ve noticed your vegetables are freezing solid in the crisper drawers. Before you start pricing out a new appliance or dialing a pricey repair service, take a deep breath. The culprit is very often a simple, fixable issue. Learning How To Fix A Clogged Refrigerator Drain Tube is one of the most empowering DIY skills any homeowner can have, and I’m here to walk you through it, step by step. It’s easier than you think, and it’ll save you a whole lot of headache and cash.
Why Does a Refrigerator Drain Tube Clog in the First Place?
Before we roll up our sleeves, it helps to understand what’s actually happening inside your trusty fridge. Your refrigerator isn’t just a cold box; it’s an active environment. Modern fridges run a regular defrost cycle to melt away any frost that builds up on the evaporator coils in the freezer.
Think of it like a tiny, self-regulating winter wonderland. As that frost melts, the water has to go somewhere. It drips down into a collection funnel and flows through a small drain tube to a shallow pan at the bottom of the unit, where it harmlessly evaporates.
A clog happens when this tiny plumbing system gets blocked. The usual suspects are:
- Tiny food particles: A stray pea, a bit of lettuce, or other small debris can get washed down and create a blockage.
- Ice buildup: If the tube freezes, it creates an ice dam, preventing water from draining.
- Mold and mildew: The dark, damp environment of the tube is a perfect breeding ground for gunk and slime, which can build up over time.
When the water can’t escape through the tube, it backs up and finds the path of least resistance—which is often onto the floor of your freezer or down into the fresh food compartment.
The Telltale Signs: Is Your Drain Tube Clogged?
Not sure if a clogged drain is your problem? Here are the most common symptoms that scream “blocked drain tube!”
- Puddles of water on the floor in front of the refrigerator.
- Excessive water pooling under your crisper drawers. This is the most classic sign.
- A sheet of ice forming on the bottom of your freezer compartment.
- Heavy condensation or “sweating” inside the fresh food section.
- A musty or mildewy smell coming from inside the fridge or freezer.
If you’re nodding along to any of these, it’s a pretty safe bet we need to clear that drain.
A Word from the Pros: “We get service calls for leaking refrigerators daily,” says David Chen, a certified appliance technician with over 20 years of experience. “I’d say 7 out of 10 times, the root cause is a simple clog in the defrost drain. It’s a five-minute fix for us, but it’s something most homeowners can absolutely handle themselves with the right guidance.”
The Main Event: How to Fix a Clogged Refrigerator Drain Tube Step-by-Step
Alright, let’s get down to business. We’re going to tackle this methodically. Don’t worry, you don’t need to be a mechanical engineer.
Step 1: Safety First – Power Down!
Before you do anything else, unplug your refrigerator from the wall outlet. This is non-negotiable. You’ll be working with water, and electricity and water are not friends. Move your perishable food into a cooler with some ice packs to keep it safe.
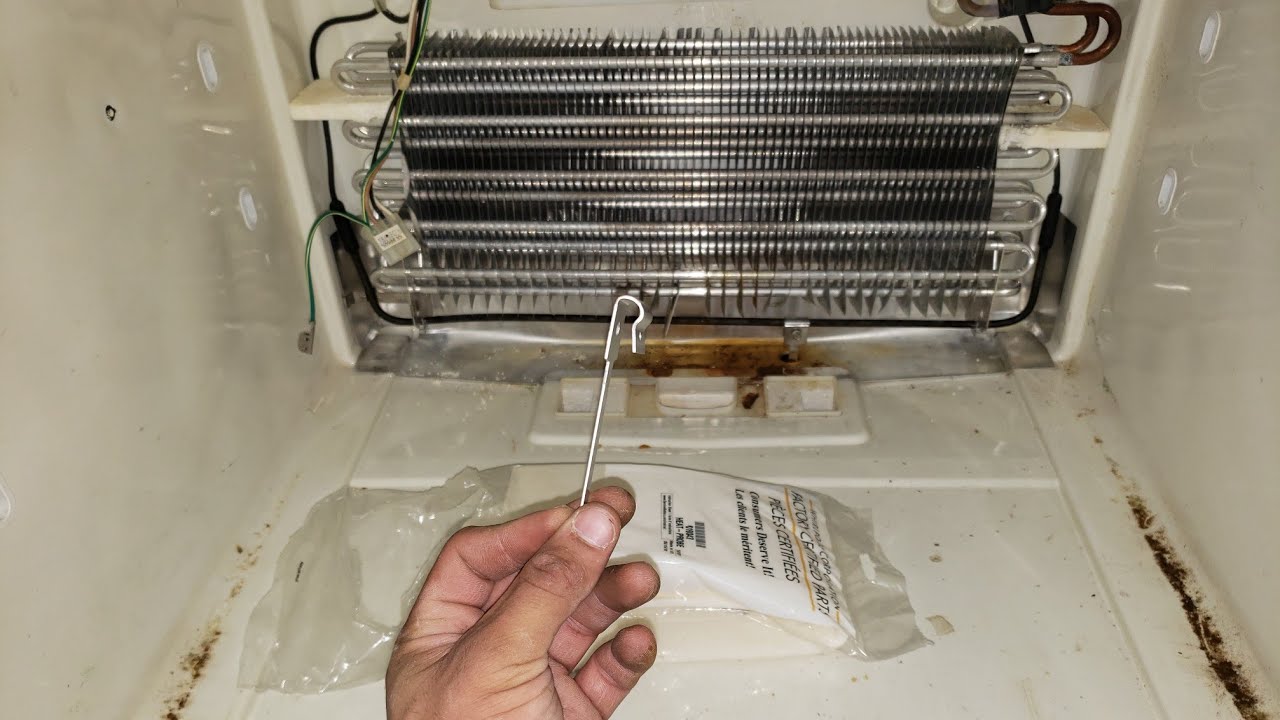
Step 2: Locate the Drain Tube Opening
The drain hole is almost always located inside the freezer, at the very back. It’s usually centered at the bottom of the back panel, just below the evaporator coils. You may need to remove the freezer shelves and the drawer basket to get a clear view. In some models, there might be a plastic panel covering the coils that you’ll need to unscrew and remove to access the drain hole.
Step 3: Clear Any Obvious Ice
You’ll likely see a layer of ice covering the drain hole. The goal is to melt it, not chip it away with a sharp object, which could puncture the freezer lining.
- Use a turkey baster or a syringe to squirt hot (not boiling) water directly onto the ice until it’s completely melted.
- Use old towels to soak up the melted ice and water.
Step 4: Flush the Clog Out
Now for the main act. This is where we force the clog out of the tube. You have a few options here.
- The Turkey Baster Method: Fill a turkey baster or a large syringe with a solution of warm water and a tablespoon of baking soda (this helps clean and deodorize). Firmly press the tip of the baster into the drain hole to create a seal and forcefully squeeze the water down the tube. You may need to do this several times. You’ll know it’s clear when you hear the water successfully drain into the pan below.
- The Pipe Cleaner Method: Gently insert a thin, flexible pipe cleaner or a piece of stiff wire (like a straightened coat hanger, but be careful not to puncture the tube) into the drain. Wiggle it around to break up the debris. Don’t force it too hard. Follow this up with the warm water flush.
Important: Never use harsh chemical drain cleaners like you would for a kitchen sink. These can damage the plastic tubing and other components of your refrigerator.
Step 5: Clean the Drain Pan
While you’re at it, let’s finish the job right. The drain pan is usually located at the bottom of the refrigerator, accessible from the back. You may need to remove a small access panel.
- Slide the pan out carefully. It will likely have some stagnant, gunky water in it.
- Empty it into the sink and wash it thoroughly with soap and warm water. A little bit of vinegar can help kill any mildew.
- Dry it completely and slide it back into place.
Step 6: Reassemble and Power Up
Put any panels, shelves, and drawers back where they belong. Plug the refrigerator back in. It will take a few hours for it to return to its optimal temperature. Now is a great time to give the interior a quick wipe-down with a food-safe cleaner. Check out our guide on [proper refrigerator maintenance tips] for more ideas.
An Ounce of Prevention: Keeping Your Drain Clear for Good
You’ve successfully learned how to fix a clogged refrigerator drain tube, and you want to avoid a repeat performance. Here’s how:
- Quarterly Flush: Every 3-4 months, flush the drain tube with a turkey baster full of warm water and a little baking soda or vinegar. This takes two minutes and prevents gunk from building up.
- Keep it Clean: Don’t let loose food particles accumulate on the freezer floor. Clean up spills promptly.
- Proper Food Storage: Make sure food is well-wrapped and not pushed up against the back wall of the freezer, which can interfere with airflow and cause icing issues.
Frequently Asked Questions About Clogged Fridge Drains
Can a clogged drain tube stop my fridge from cooling properly?
Yes, absolutely. When the drain is clogged and ice builds up around the evaporator coils, it can obstruct airflow. This prevents cold air from circulating effectively, leading to poor cooling in both the freezer and the fresh food compartments.
How often should I clean my refrigerator drain tube?
As a preventative measure, a quick flush with warm water every 3 to 6 months is a great idea. If you notice any of the telltale signs of a clog, you should address it immediately.
What if I can’t find the drain tube in my freezer?
If it’s not immediately visible, it’s likely behind a rear panel inside the freezer. Consult your refrigerator’s user manual (you can usually find it online by searching your model number) for a diagram. Models with the freezer on the bottom may have a slightly different configuration.
Is it safe to pour vinegar or bleach down the drain tube?
A small amount of distilled white vinegar mixed with water is generally safe and can help kill mold. However, you should never use bleach. It’s too corrosive and can degrade the plastic and rubber components of your refrigerator’s drain system.
When is it time to call a professional repair service?
If you’ve followed all these steps and the water problem persists, or if you’re uncomfortable removing panels inside your freezer, it’s time to call a pro. The issue could be more complex, such as a malfunctioning defrost timer or heater.
A Job Well Done
Congratulations! By taking a little time to understand and tackle this common household problem, you’ve not only fixed your appliance but also saved yourself from a potentially expensive repair bill. Knowing how to fix a clogged refrigerator drain tube is a testament to the power of a little DIY spirit. Now, you can go back to enjoying that perfectly chilled midnight snack, puddle-free and worry-free, knowing your refrigerator is running just as it should.